
Shaving a Cane Bagpipe Chanter Reed
When physically removing cane from a bagpipe chanter reed, you must always proceed with extreme caution. Always remove very small amounts of material at a time and thoroughly test the instrument between adjustments. It is incredibly easy to take cane off, but you cannot put it back on if you make a mistake. If your reed is too hard or uncomfortable to blow, learning how to safely ease it will dramatically improve your playing experience.
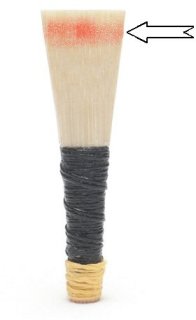
Where to Shave a Chanter Reed
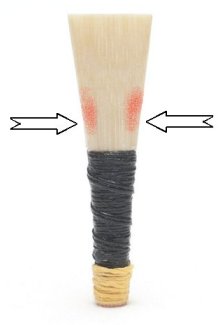
Different areas control pitch and stability. Refer to the adjacent diagrams for blade placement.
If it is tight in response then using a sharp blade very gently shave the upper region of the blades remembering to remove the cane evenly across the width of both blades. Be aware that this will also flatten off the top hand notes a little and it may be necessary to sink the reed a little in the chanter to compensate for this.
Avoid shaving the lips of the reed.
Shaving a Chanter Reed Around the Shoulders
If the response is good (a slight tightness is desirable for stability), then you can ease it slightly by removing small amounts off the shoulders just above the staple. Remove this evenly on both sides of each blade.
Be aware that this will slightly sharpen some of the bottom-hand notes, particularly C and D. It will also increase the response, but not quite as much as removing cane from the upper region of the blades.
Using a Dental Band for Blowing in Chanter Reed Sets
Another method often employed is the application of a small elastic dental band. This is very effective and can often help stabilise a reed in its initial blowing in chanter reed period.
Two or three wraps of the band around the sound box will ease a reed considerably; it will also lift the pitch.
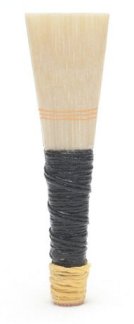
This band can remain on the reed for the duration of its life. It is effective in raising and lowering the pitch in small increments to assist with tuning, particularly within a pipe band environment.
- To raise the pitch: Simply slide the band a little further towards the lips of the reed.
- To lower the pitch: Slide it down towards the metal staple.
Be aware that if you place the band too high, it will muffle the reed too much. To avoid this, always keep the band within the sound box area.
Correcting a Flat C and Double Toning F
On occasions, this can occur with any reed and chanter combination, but you can fix this easily. Try using these three troubleshooting methods:
- Use a Dental Band: Utilizing the small elastic band, as already mentioned, is a very effective solution.
- Adjust the Seating Depth: If the reed is sunk too far into the chanter seat, try lifting the reed out a small fraction.
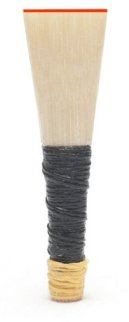
- Clip the Tips: Alternatively, using a very sharp blade, cut a hair's width off the top of the blades. This will raise the overall pitch and strengthen the reed slightly.
Note: Be incredibly careful when clipping the tips. Taking too much material off can dramatically raise the pitch of High F, High G, and High A. If this occurs, they can be brought back down by thinning the upper region of the blades, but remember this will then weaken the reed also.
Troubleshooting a Croaky High A Note
A number of physical or technique-related issues can cause this fault. Work through these four solutions:
- Increase Blowing Pressure: If there is insufficient pressure on the cane, simply blow a little harder and it will clear. Every setup requires slightly different pressures to obtain an optimum sound; maintain steady pressure at all times or an unsteady bagpipe will result.
- Check the Staple Clearance: The bottom of the metal staple might be touching the side of the reed seat wall. Ensure that this area has a proper, snug wrap of hemp around it.
- Adjust Seating Depth: If the reed is sunk too far down into the reed seat, lift the reed up a small fraction.
- Smooth the Blade Tips: Lastly, if a croak is highly persistent, gently rub the very tips of the reed blades at right angles across the back of your thumbnail or on a sheet of glass at a 45-degree angle. Be careful, as doing this too much will cause a very thin sound on your top hand notes.
Fine Tuning the Chanter Scale
You can easily achieve excellent fine-tuning of the chanter with the use of tape applied across the top of the open hole of any note that sounds sharp.
Fine-tuning with tape is very straightforward, though to begin with, it is a basic trial and error process. The rule to remember is simple: more tape covering the hole equals a flatter note.
Notes that remain persistently flat across a variety of different reeds should instead be physically undercut. This advanced undercutting process should be left in the hands of an experienced player or a trusted manufacturer. See our specialized guide to Fine Tuning a Chanter for complete step-by-step information on taping and undercutting techniques.